Teacher Guide
You are a Teacher. You take the class register, enter scores, write lesson plans, set assignments, tests and exams, and talk to parents. You only see the classes the School Admin assigned to you.
Your day
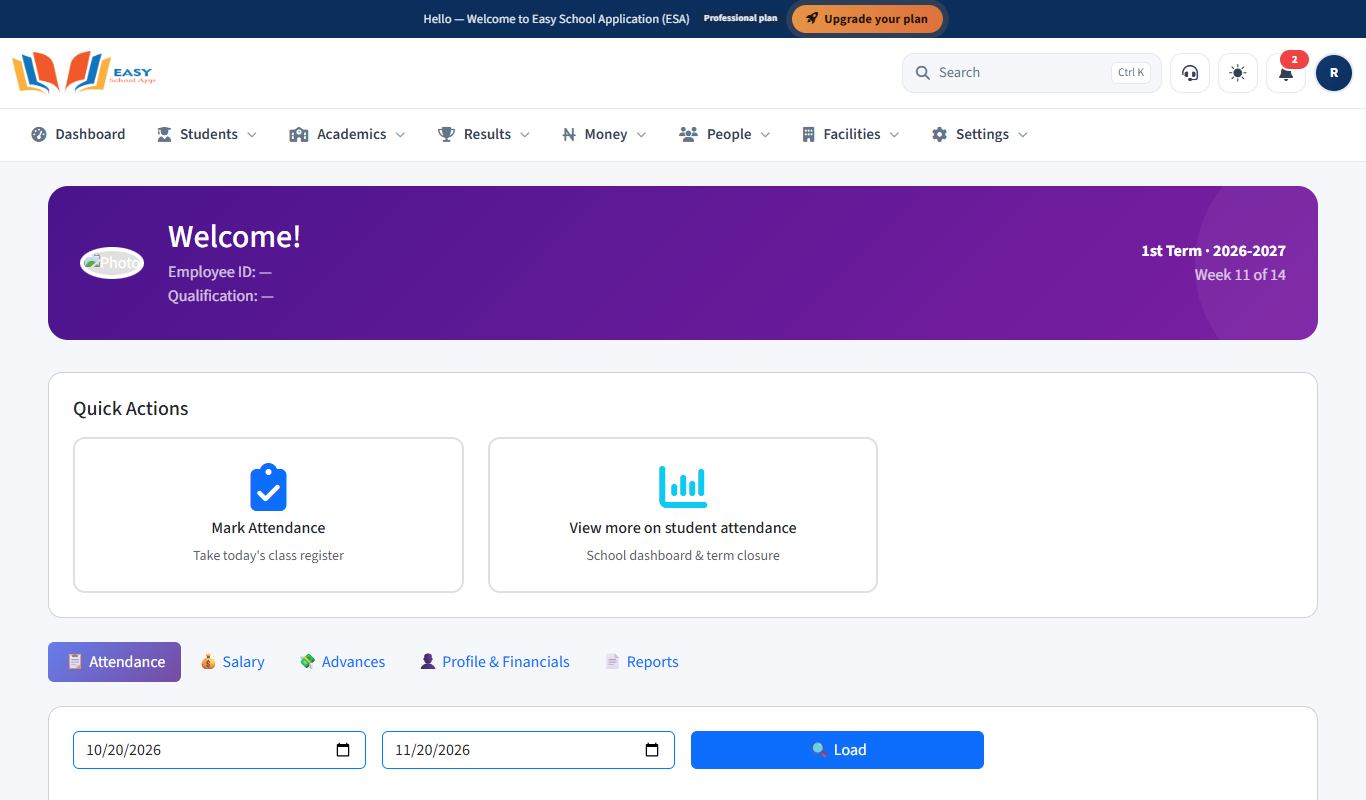
- Sign in and open Mark Attendance on the Dashboard. Mark the register.
- Check Today's Timetable on the Dashboard.
- Reply to parents in Messages.
Your week
- Write your lesson plan and submit it.
- Give and grade assignments.
End of term
- Enter scores for every subject you teach, before the deadline.
- Check your class in Class results.
Where your menus are
- My portal (top menu): My dashboard, My students, Mark class register, My classes' analytics, My timetable, My attendance, My salary, My advances, My employee profile, My reports.
- Results: Enter scores, Enter scores by student, Behaviour & skills (class teachers), Class results.
- Academics: CBT & assignments, Lesson plans, Exam timetable.
- Dashboard: the My teaching section shows today's register, your classes and what is due.
Register and students
Mark the class register (student attendance)
Purpose: Record which students are present, absent, late, excused or on half day. Parents can see attendance, and the school sees trends in Attendance Analytics.
Who can use it: Teacher (own classes), School Admin, Principal.
Where: Teachers: avatar › My Portal › Mark Class Register. School Admin and Principal: Students › Student register. Everyone: Mark Attendance on the Dashboard.
Steps
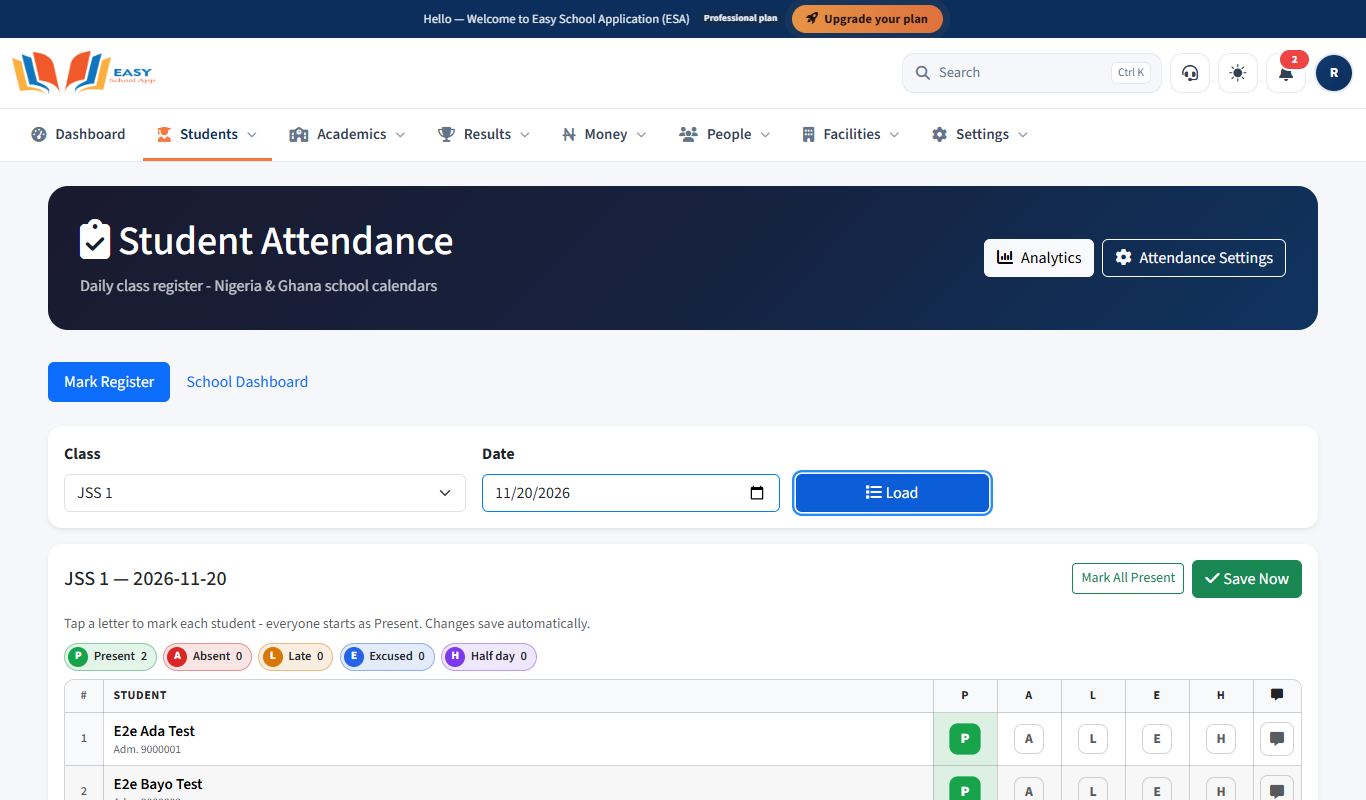
- Open the register. The Mark Register tab opens.
- Choose the Class and Date (today is filled in). If your school marks twice a day, choose Morning (AM) or Afternoon (PM).
- Click Load. Your students appear. Everyone starts as Present.
- Tap a letter for each student who is not present:
- P – Present
- A – Absent
- L – Late
- E – Excused
- H – Half day
- Optional: click the remark icon to add a note (for example "Went home sick").
- Changes save automatically. Click Save Now if you want to save at once.
For School Admin and Principal
- The School Dashboard tab shows each class's status today (Marked / Not marked).
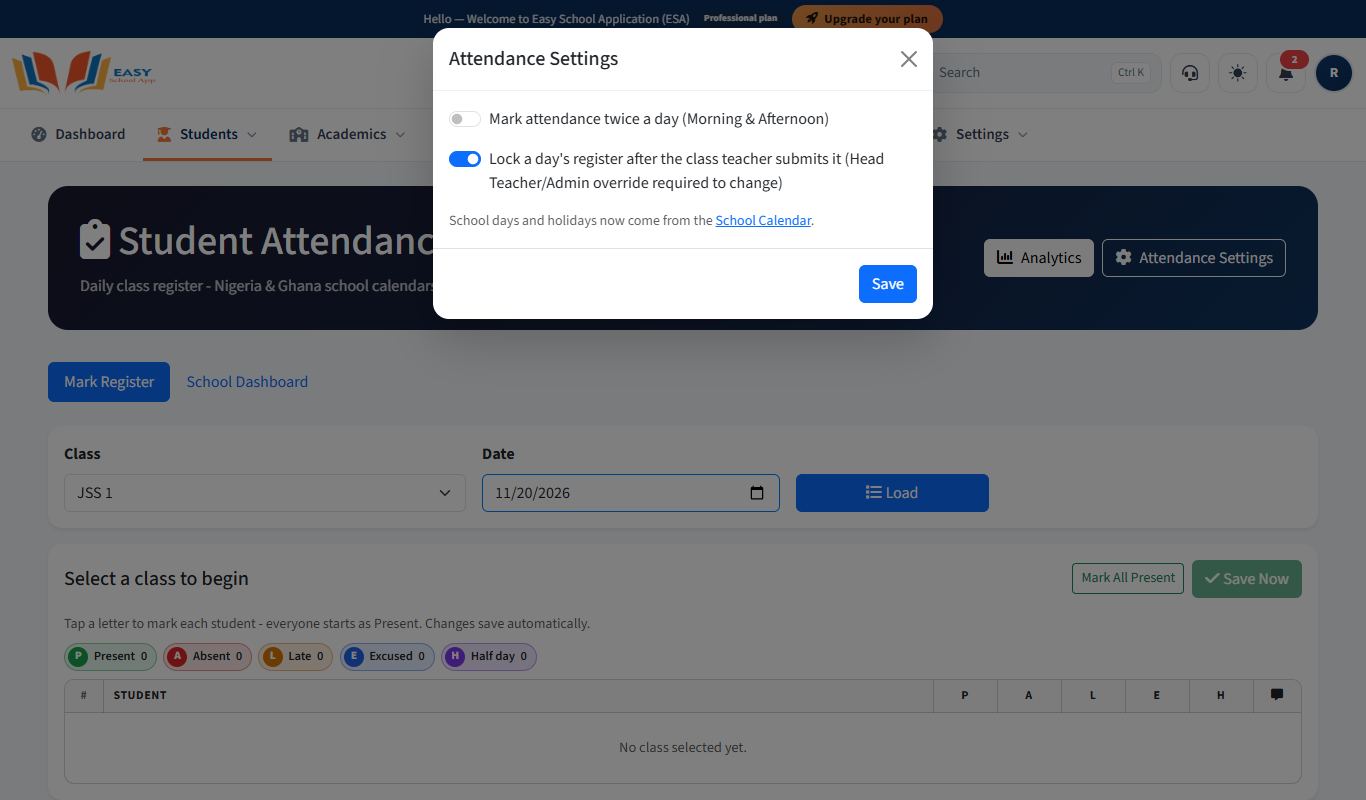
- Attendance Settings lets you mark twice a day, and lock a day's register after the class teacher submits it. A locked day can only be changed by a Head Teacher or Admin; the change is recorded as an override.
- Term Closure totals the days opened at the end of a term. Choose the class, Term and session, click View to check, then Close Term.
Common errors and fixes
| Problem | Fix |
|---|---|
| "No class assigned" | The teacher has no teaching assignment. Ask the School Admin to add one in Teaching Assignments. |
| "Attendance is closed today." | Today is a weekend or holiday in the Sessions & term dates. |
| "Attendance is closed." for a past day | The day is locked. Contact your Head Teacher or Admin if a correction is needed. |
| "No students in this class." | No students are placed in that class and section. Check the Student List. |
Review attendance analytics
Purpose: See attendance rates for the school, each class and each student, and find students at risk of poor attendance.
Who can use it: School Admin, Principal, Teacher (own classes, shown as My Classes' Analytics).
Where: Students › Attendance analytics
Steps
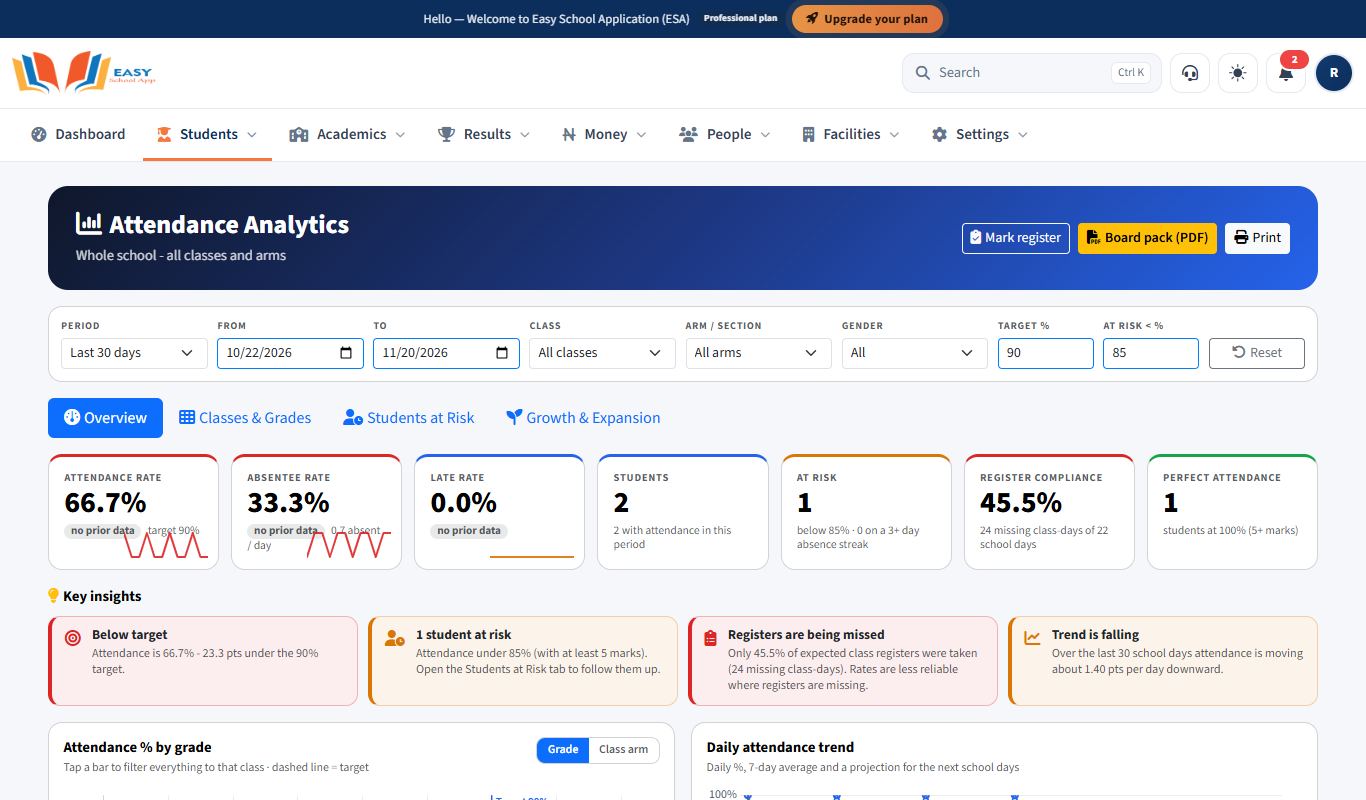
- Open Students › Attendance analytics.
- Choose the Period (or From and To dates). Optionally choose a Class, Arm / section and Gender.
- Set the Target % and the At risk < % level.
- Read the tabs:
- Overview – overall rate and trend.
- Classes & Grades – rates by class.
- Students at Risk – students below your at-risk level.
- Growth & Expansion – enrolment and attendance over time.
- Click Board pack (PDF) for a printable summary, or Print. Click Reset to clear the filters.
See your students
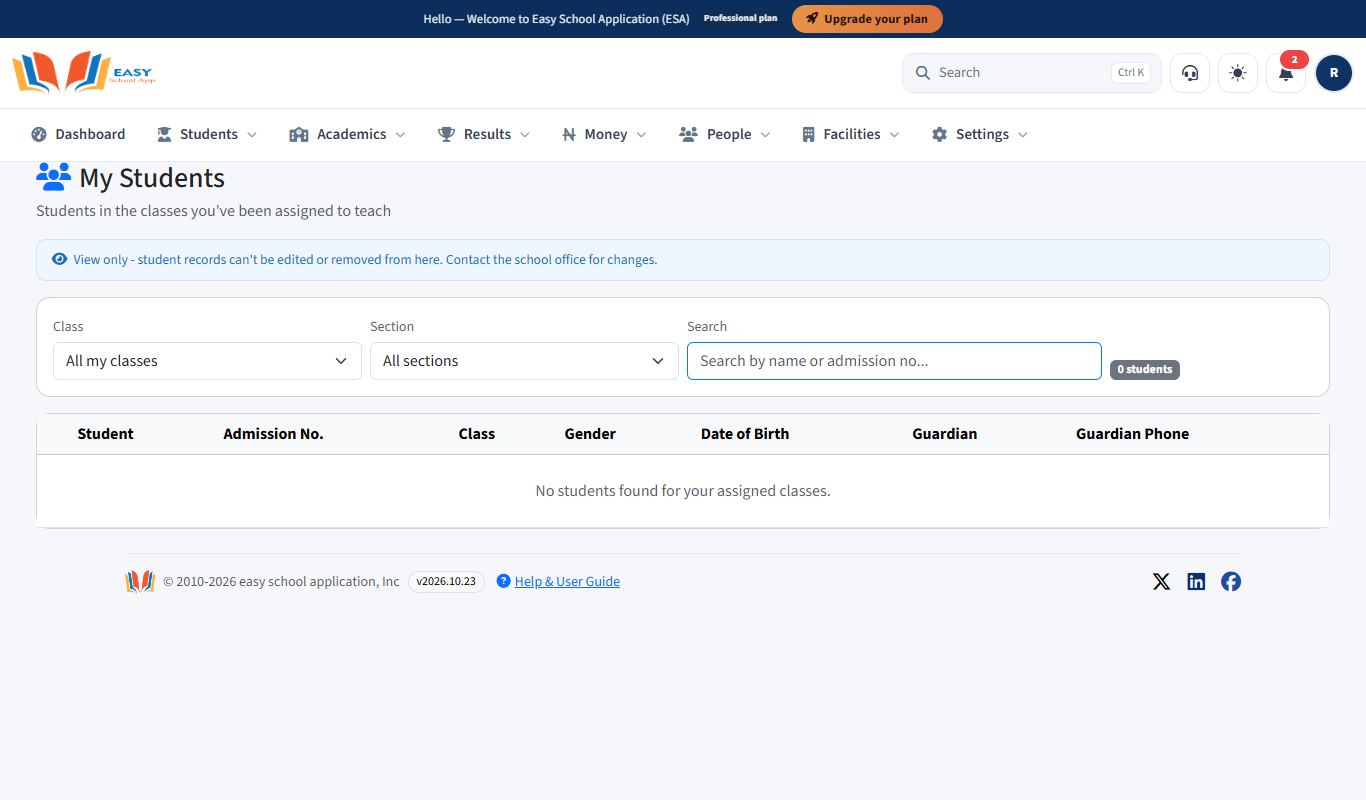
Purpose: See the students in the classes you teach, with their guardians' phone numbers.
Who can use it: Teacher, Head Mistress, Principal, School Admin.
Where: avatar › My Portal › My Students
Steps
- Click your avatar, then My Students.
- Choose the Class and Section, or type in Search.
- The table shows each Student, Admission No., Class, Gender, Date of Birth, Guardian and Guardian Phone.
Scores and results
Enter scores for a subject
Purpose: Type each student's CA, test and exam scores for one subject in one class.
Who can use it: Teachers (only the subjects they teach), School Admin, Principal.
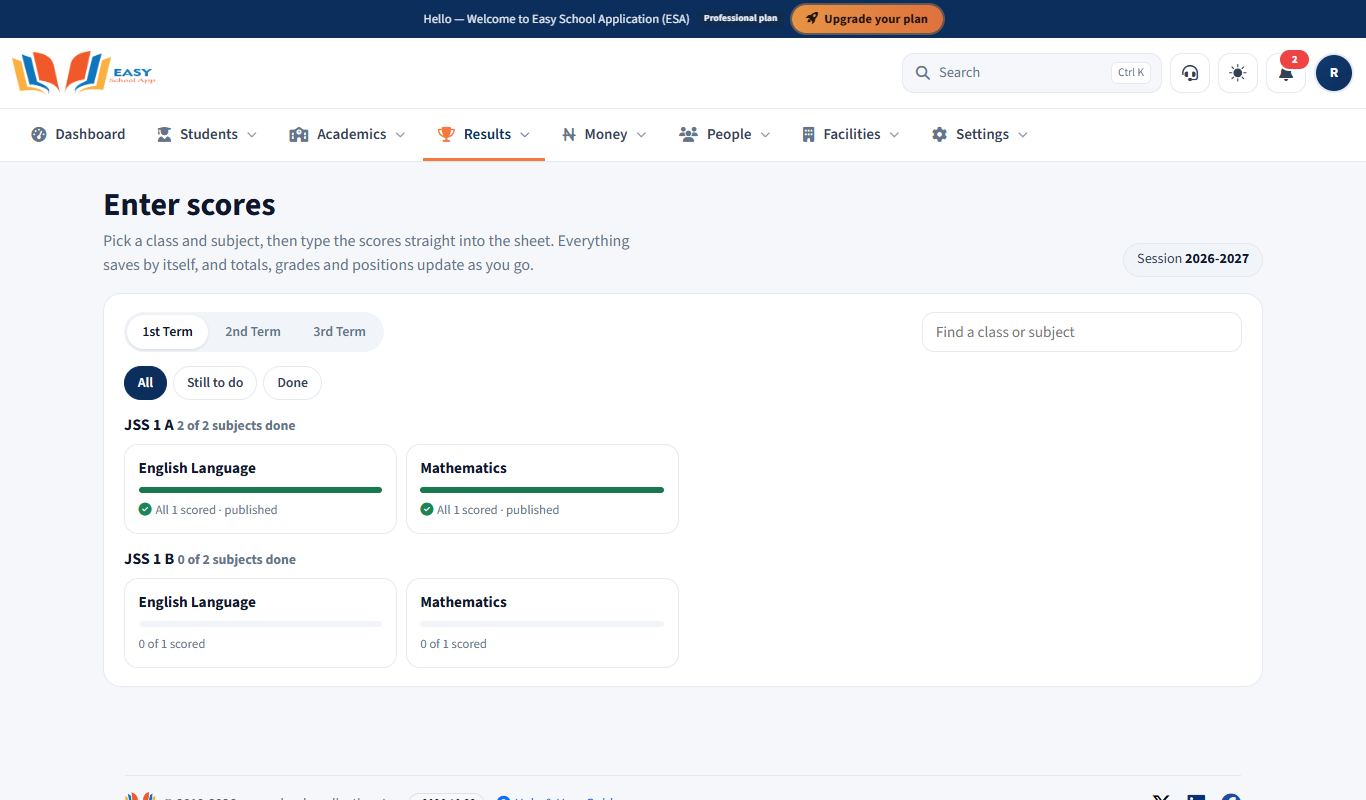
Where: Results › Enter scores
Steps
- Open Results › Enter scores. You see a card for every class and subject you teach, with progress like "18 of 25 scored".
- Click a card. Every student in the class is listed, ready to type into. The column headings show your school's limits, for example Exam /60.
- Type a score, then press Enter (or the down arrow) to go to the next student. Tab moves to the next column.
- It saves by itself. Watch the corner: Saving…, then All changes saved.
- Click Next sheet to go straight to your next subject.
Common errors and fixes
| Problem | Fix |
|---|---|
| A box turns red, for example "Exam can't be more than 60" | The score is over the limit. Fix it and the row saves. |
| I can't see a subject I used to see | You only see subjects you teach. Ask the School Admin to assign it to you in Academics › Teaching assignments. |
| I can't click 2nd or 3rd term | That term hasn't started by your school's term dates. |
| The sheet shows a lock | The class is published. Only an admin can unlock it for a correction. |
Rate behaviour and skills
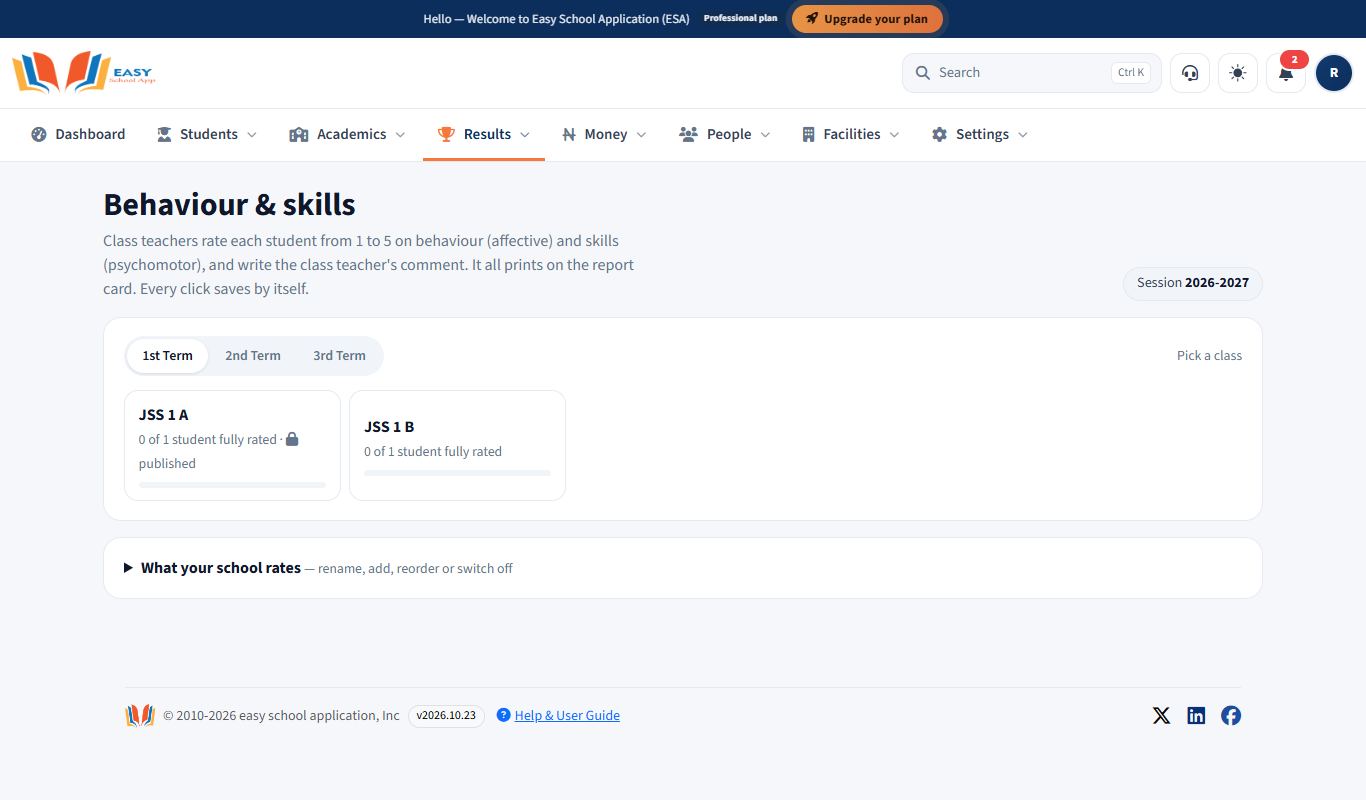
Purpose: Rate each student's behaviour (affective) and skills (psychomotor) from 1 to 5, and write the class teacher's comment for the report card.
Who can use it: Class teachers (for their own class), School Admin, Principal.
Where: Results › Behaviour & skills
Steps
- Open Results › Behaviour & skills and click your class.
- For each student, click a number next to each trait: 5 Excellent, 4 Very good, 3 Good, 2 Fair, 1 Poor. It saves straight away. Click the same number again to clear it.
- Type your comment in the box underneath. Leave it empty to keep the automatic remark.
- Shortcuts: Same rating for every trait (one student), Give everyone this (one trait, or every trait, for the whole class) and Copy last term's ratings.
Enter all subjects for one student
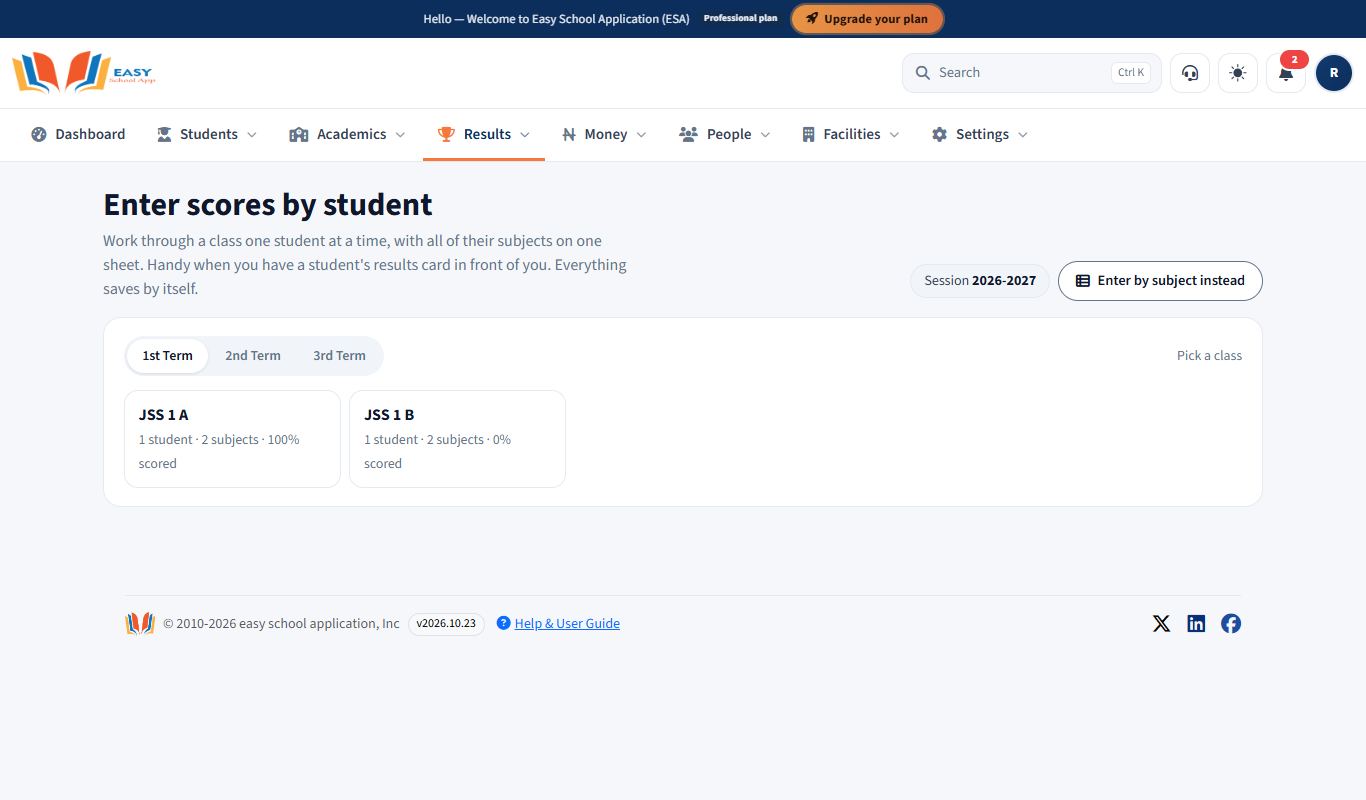
Purpose: Type one student's scores for every subject at once, for example when copying from a results card.
Who can use it: School Admin, Principal, Teachers (their own subjects).
Where: Results › Enter scores by student
Steps
- Open Results › Enter scores by student and pick a class.
- Work down the list of students on the left (on a phone, choose from the drop-down).
- Type each subject's scores. It saves by itself, the same way as Enter scores for a subject.
Check results before publishing
Purpose: Review a class's results by student and by subject, and print a broadsheet.
Who can use it: School Admin, Principal, Teachers (the subjects they teach).
Where: Results › Class results
Steps
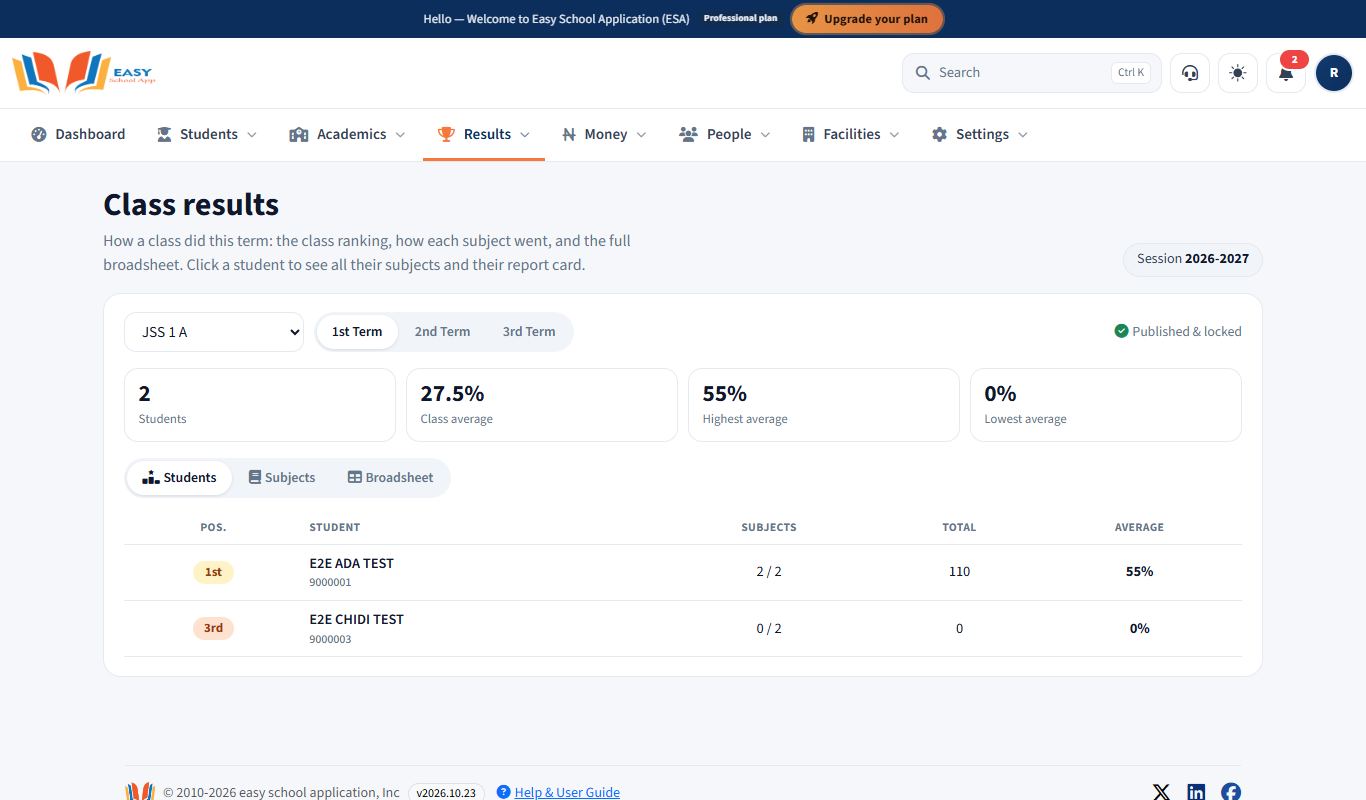
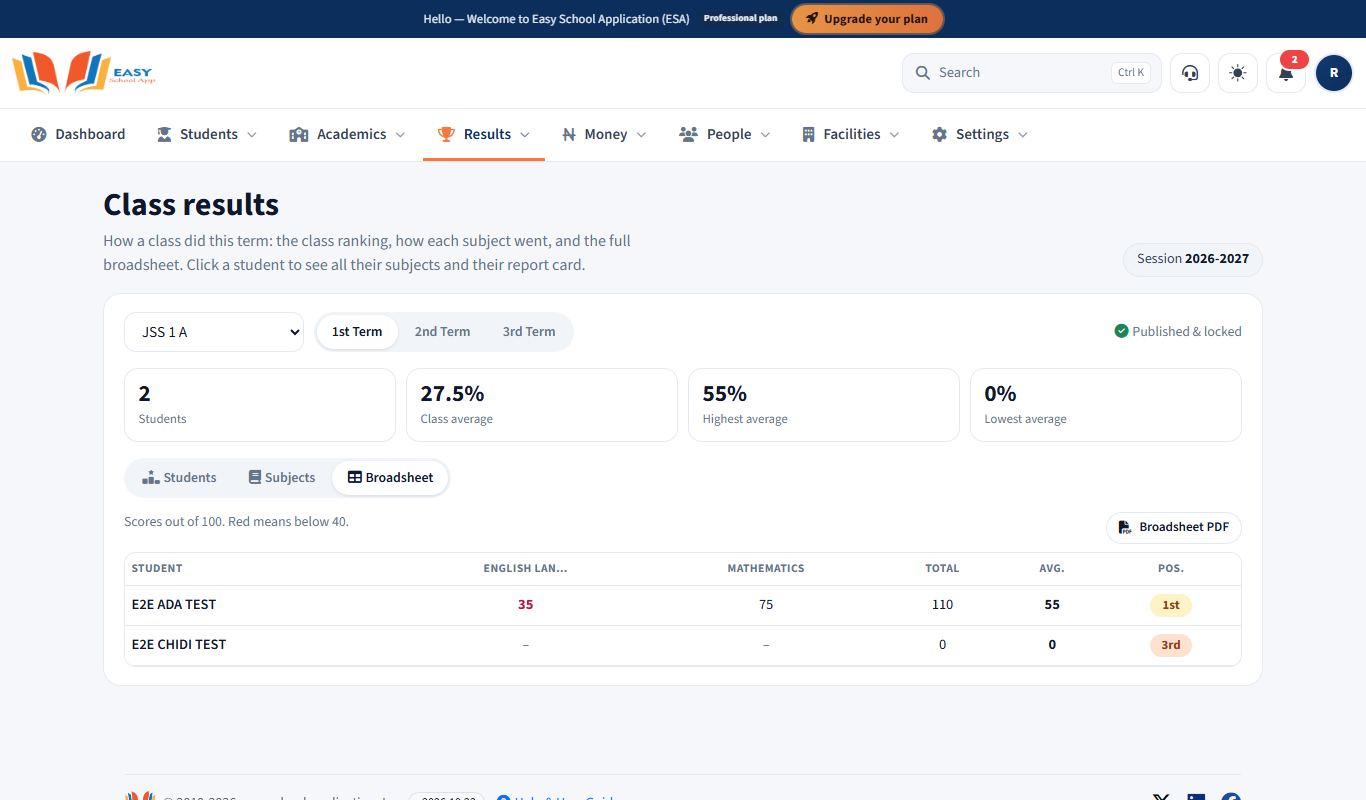
- Open Results › Class results. Pick a class and term.
- Use the tabs:
- Students – the class ranking with positions, totals and averages.
- Subjects – each subject's average, highest and lowest score, pass rate and best student. Click a subject to see every student's position in it.
- Broadsheet – every student and every subject on one screen (scores below 40 in red). Click Broadsheet PDF to print it.
- Click any student to see all their subjects, their report card and the Full student report: their position, how they compare with the class in each subject, their strongest and weakest subject, and their average each term.
Teaching
Write and submit a lesson plan
Purpose: Plan each week's lesson and send it to your Head Mistress or Principal for approval.
Who can use it: Teacher. School Admin, Principal and Head Mistress can also write plans.
Where: Academics › Lesson plans
Steps
- Open Academics › Lesson plans.
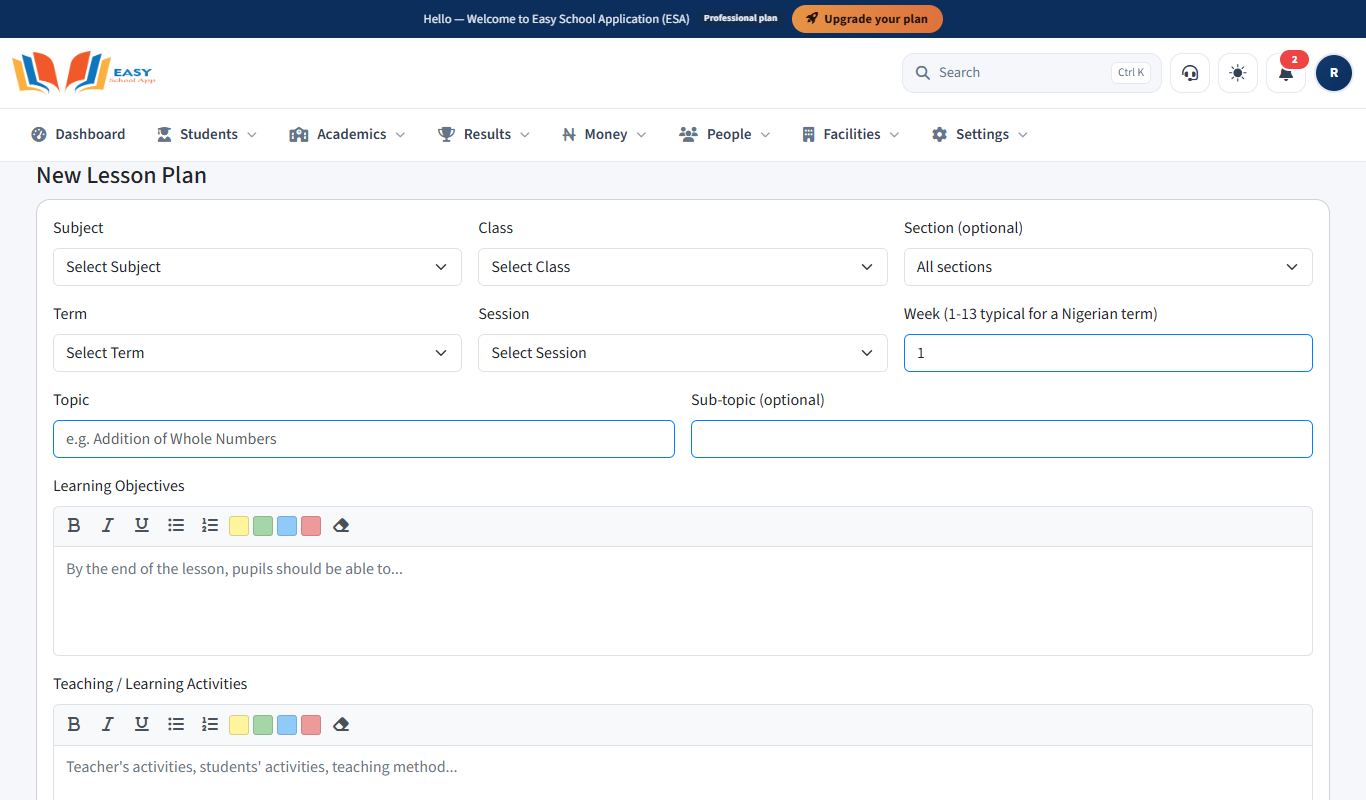
- Click New Lesson Plan.
- Choose the Subject, Class, Section (optional), Term and Session.
- Type the Week (1–13 in a typical Nigerian term), the Topic and the Sub-topic (optional).
- Fill in Learning Objectives, Teaching / Learning Activities, Instructional Materials and Assessment Method.
- Click Save as Draft. You can come back and change it.
- When it is ready, open it and click Submit for review. The status changes to Submitted.
- After you teach the lesson, click Mark as taught and add a Progress Note if you wish.
Common errors and fixes
| Problem | Fix |
|---|---|
| You cannot change a submitted plan | Submitted plans are locked while they are reviewed. Ask the reviewer to Send Back the plan. |
Give and grade assignments
Purpose: Give students homework online, collect their answers, and grade them.
Who can use it: Teacher. School Admin, Principal and Head Mistress can also use it.
Where: Dashboard Quick Actions › Assignment Management (the Teacher Dashboard page)
Steps – create an assignment
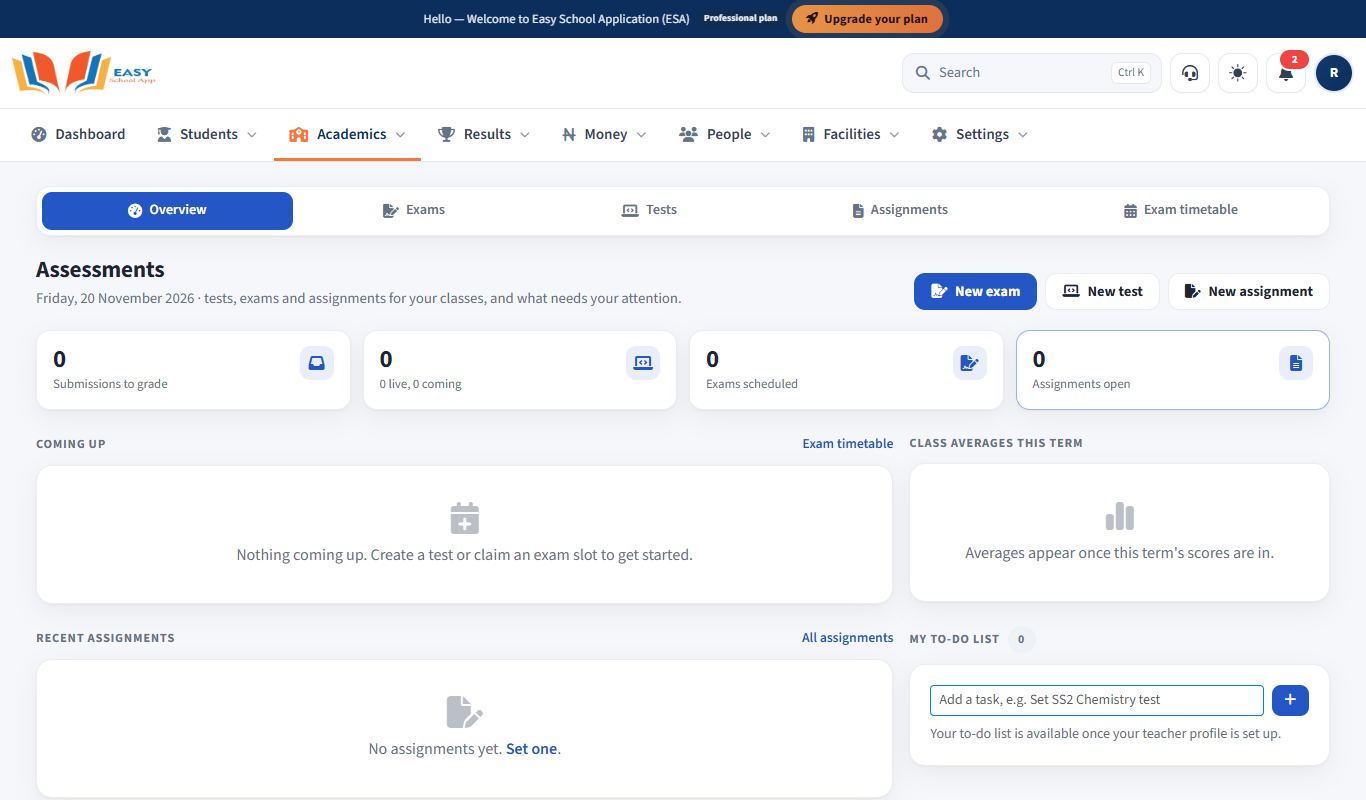
- On the Dashboard, click Assignment Management. The Teacher Dashboard opens.
- Click New Assignment (or Create New Assignment on the My Assignments page).
- Type the Assignment Title.
- Choose the Subject, Class, Term, Session and Section/Group.
- Choose the Start Date and Due Date, and type the Total Marks.
- Add a Description and Instructions. You can upload an Instruction File (PDF) of up to 10 MB.
- Save. Students see it in their portal, and parents see it under Academics › CBT & assignments.
Steps – grade submissions
- On the Teacher Dashboard, click Grade Submissions (or open the assignment from Recent Assignments).
- Under Student Submissions, open each student's Submitted File or Text Answer.
- Type the Marks and Remarks, and save.
- To give the same mark to everyone not yet graded, use Bulk Grading: type the Marks for All Pending Submissions and click Apply to All Pending.
Common errors and fixes
| Problem | Fix |
|---|---|
| "Class is required. Please select a subject." | Choose the Subject first. The class list fills in after that. |
| You cannot create more assignments | You have reached Maximum assignments per term. Check with the admin for a higher limit. |
Set CBT tests and exams
Purpose: Create computer-based tests (CBT) and exams with multiple-choice questions. Students take them in the Student Portal and are marked automatically.
Who can use it: Teacher, School Admin. Principal and Head Mistress can manage exams.
Where: Teacher Dashboard New Test / New Exam / Manage Exam Questions
Steps – create a test
- On the Teacher Dashboard, click New Test (or Create New Test on My Tests).
- Under Test Information, type the Test Title and choose the Subject, Class, Term, Session and Section (Optional).
- Set the Start Time, End Time, Duration (Minutes) and Total Marks.
- Choose Shuffle Questions, Shuffle Options and Show Result Immediately if you want them.
- Add Questions: type the Question Text, Option A to Option E (A and B are required), choose the Correct Answer and the Marks. Add an Explanation (Optional).
- Save.
Steps – create an exam
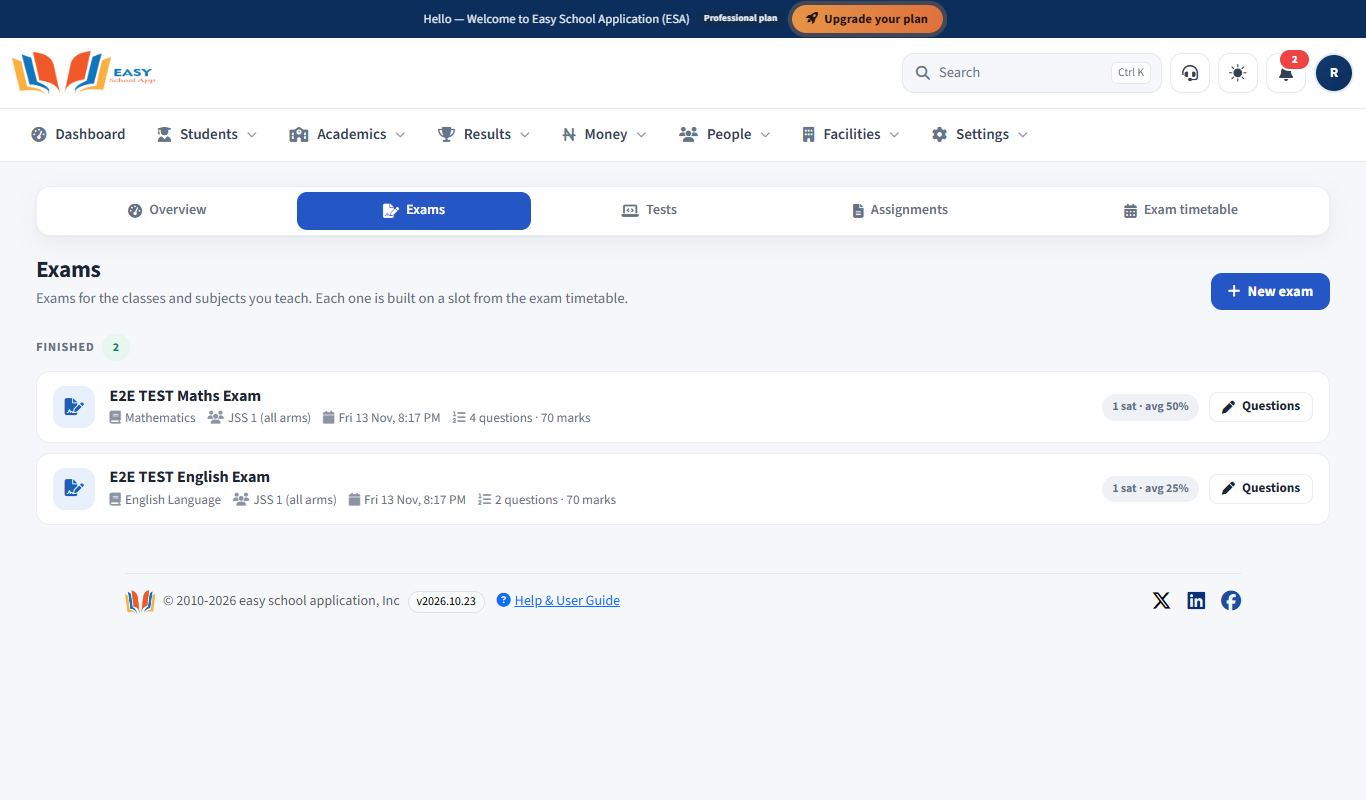
- Make sure the exam has a slot in the Exam Timetable.
- On the Teacher Dashboard, click New Exam (or Exam Management › New Exam).
- Click Manage Questions on the exam.
- Click Add Objective Question for a normal question, or Add Comprehension Passage to add a reading passage with questions under it.
- Click Save Question, or Save & Add Another to continue.
Common errors and fixes
| Problem | Fix |
|---|---|
| Students cannot see the test | Check the Start Time and End Time, and that it is for the right class and section. |
| "No questions yet" | Open Manage Questions and add questions. |
Set up the exam timetable
Purpose: Schedule each exam paper by class, subject, date and time. Parents and students see the timetable, and teachers build CBT exams on these slots.
Who can use it: School Admin, Principal, Head Mistress, Teacher.
Where: Academics › Exam timetable
Steps
- Open Academics › Exam timetable.
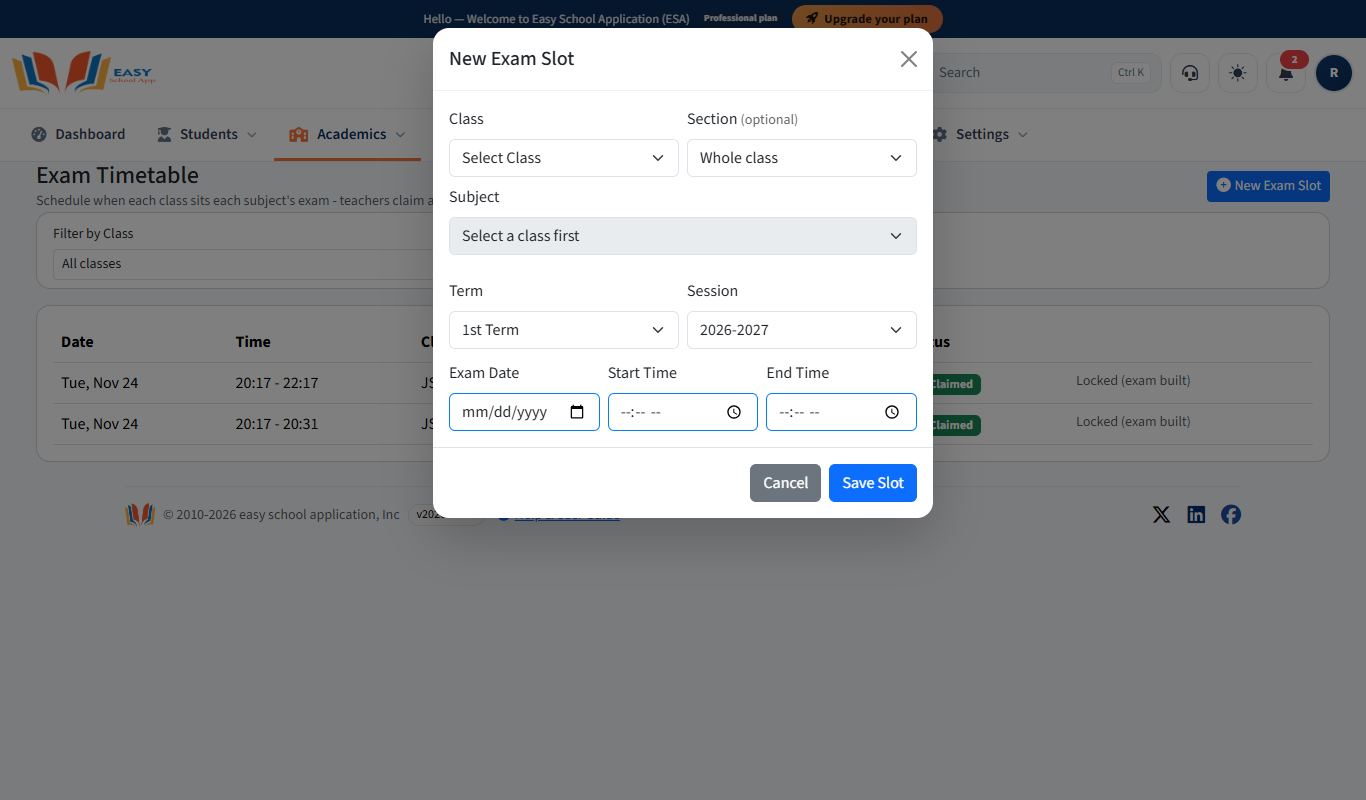
- Click New Exam Slot.
- Choose the Class, Section (optional), Subject, Term and Session.
- Choose the Exam Date, Start Time and End Time.
- Click Save Slot.
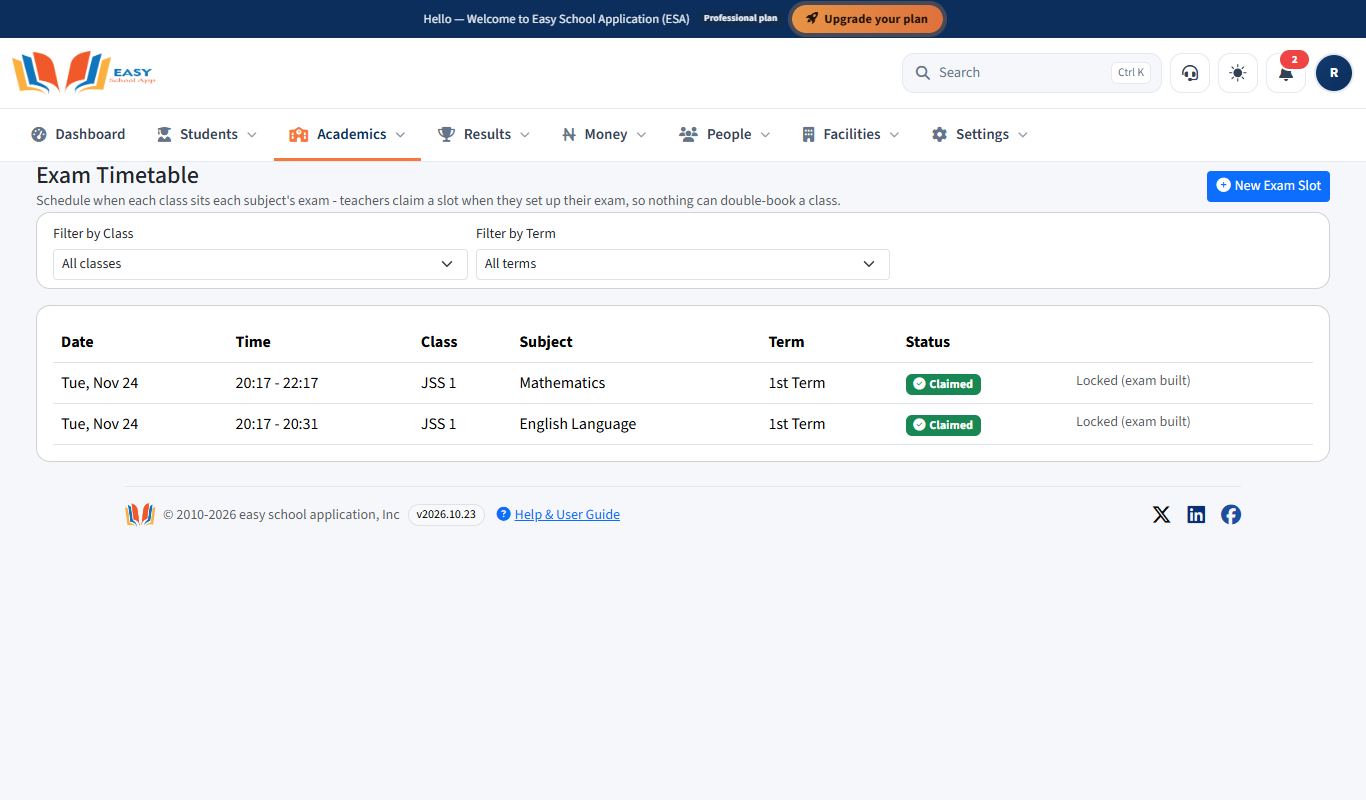
- Use Filter by Class and Filter by Term to check the timetable.
Parents and your own records
Chat with parents
Purpose: Send and receive messages with the parents of your students.
Who can use it: Teacher.
Where: Dashboard Quick Actions › Messages
Steps
- On the Dashboard, click the messages quick link. The Messages page opens.
- Select a student. "Select a student to start chatting with their parent."
- Type your message and send it.
- New replies show in your Notifications.
Use My Portal (your attendance, salary and payslips)
Purpose: See your own clock-in record, salary and payslips, ask for a salary advance, and keep your bank details up to date.
Who can use it: Teacher (all staff with the Teacher role).
Where: avatar › My Portal › My Dashboard (also My Attendance, My Salary, My Advances, My Employee Profile, My Reports)
Steps
- Click your avatar at the top right. Under My Portal, click My Dashboard.
- Use the tabs:
- Attendance – your clock-in and clock-out times, Status and any Penalty. Click Load to choose dates.
- Salary – your salary history.
- Advances – ask for a salary advance. Type the Amount (₦), the number of Installments and the Reason, then Submit Request. Track its status here.
- Profile & Financials – your employee details and bank account. Request a change if something is wrong.
- Reports – download your attendance report and payslips.